 The Story – It’s not (just) about the buffet!
This buffet was a real find at a local thrift store for $40! I had in mind that if I could not find a buffet, I would keep my eyes open for a dresser which would nicely double as one. Just think of all the storage space! What luck when I actually found the real deal! It’s exactly what I had been looking for to replace the one I had which was made of a composite material (and cost me a small fortune!). I had longed for a substantial buffet made of real wood – something with unique qualities and good bones. Boy, did I luck out! This piece was as well made on the inside as it was on the outside. It’s original finish was cherry though it was quite scratched up. After all, what did I expect for $40, I told myself as I struggled with the decision about whether or not I should buy it.
I wasn’t sure if I was up for the task of sprucing it up and I certainly had never challenged myself to restore a piece of furniture this large. The mere size of it was intimidating and no, I didn’t have the time! My better judgment influenced me and I actually talked myself out of this big, $40, plus 10% off for Senior Day, purchase and I left the store!
 The Dream
Well, that night I couldn’t get my mind off of the buffet. I stood in my dining room staring at the spot where it would sit. A nagging part of me wondered what my husband, Manuel, would say if I asked him, once again, to take his truck, to pick up this monstrous piece from the thrift store and to bring it home. There it would sit in our garage (the garage that we haven’t been able to park in for two years!) along with the other “projects” on my “to-do” list.
My mind’s eye could not erase the vision of how this buffet might look in that perfect spot! I imagined the order to my life having this big box would bring. A place to put all of my entertaining dishes and accessories. I saw visions of myself, perfectly coiffed and impeccably dressed sitting at the dining room table, an artful display of delectable food lain across the buffet like a Better Homes and Gardens magazine picture. Friends and loved ones would surround me admiring what they might perceive as a life of perfect order. All this for $40, how could I go wrong! With that buffet, I had convinced myself, there was a real possibility for world peace!
 The Commitment
I suppose by now it’s fairly obvious which part of my mind won this battle! So here it is, the new project. I promised myself that it would precede all the other projects and well, it almost did. But finally, I can present it to you as proof that any of us can accomplish anything (within reason) that we set our minds to. So here goes – my tutorial about restoring this buffet, and the sense of accomplishment that grew within me during the process. After all is said and done, it’s not really (just) about the buffet!
 The Process
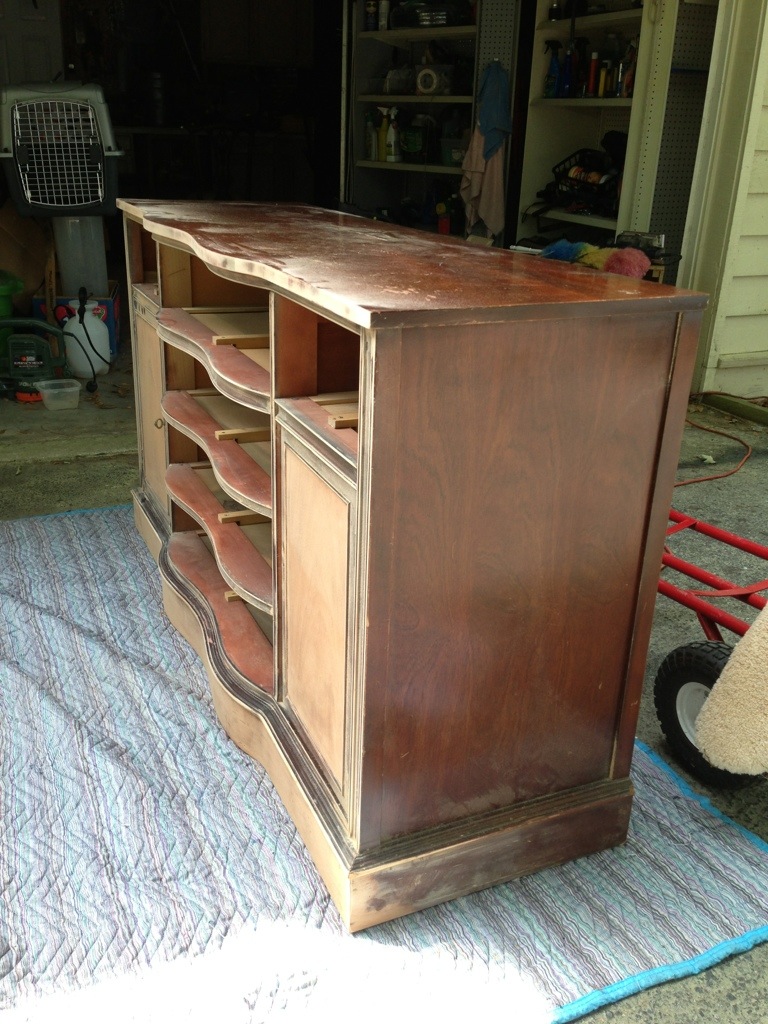
Using a belt sander, once I began the process of sanding the cherry stain off the top to remove the scratches I decided to sand the entire buffet to remove all the finish. I wanted a more natural color and decided to leave a splotch of roughed up cherry finish here and there to create a distressed look. When sanding off old finish you will want to be careful not to sand the veneer layer off. Another way to do this without sanding is to use a paint or stain remover. There are several methods of stripping furniture.
After completely sanding the old finish off I wiped the buffet with odorless mineral spirits. This alone brought out the beautiful grain of the veneer. Once dry, I used a 220 grit finishing sand paper, wiped with a soft cloth and finished with a tack cloth to remove all dust. I learned that this is a very important step.
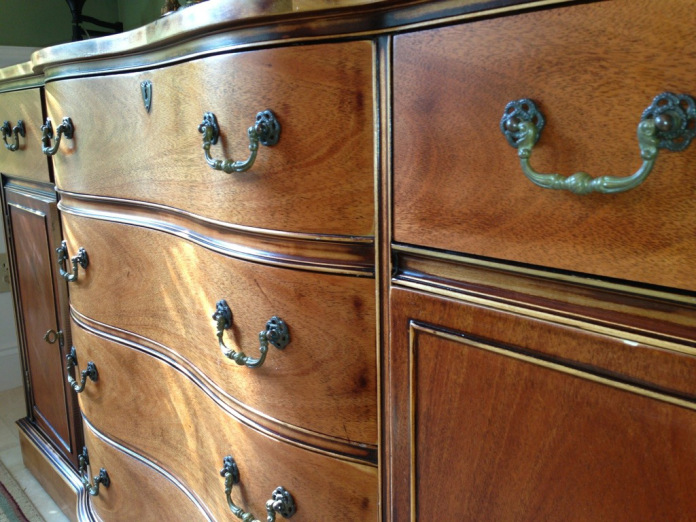
Miniwax Wipe On Poly in a clear satin finish was the first step I used to finish the piece and although it was clear satin, it still enriched the grain of the wood. Multiple applications will deepen the color but it’s necessary to allow each coat to dry fully according to the directions and to sand between each coat and wipe thoroughly before applying the next making sure to remove the dust. I didn’t want the color to be as dark as the cherry and I really liked the natural color of the wood veneer.
The buffet looked beautiful with the warm natural grain showing through but it still had a rough, porous wood, feel. I wanted the final result to have the smooth luster of a cabinet finish.
Back to Google!
After researching several sites and learning methods to help me achieve the results I desired I was finally able to get that beautiful, lustrous finish by using Miniwax Polycrylic Protective Finish in clear satin. This is a latex finish and cleans easily with water. Use according to the directions on the label. I used three coats, sanding between each. (This was time-consuming. It took a couple of weekends.) The more coats I used the more durable and glass-like the finish became. It’s Important to let each coat dry completely (at least two hours) and to lightly sand between each coat with 220 grit or something comparable for finishing. Oh, and don’t forget to wipe thoroughly with a tack cloth to avoid dust and debris from being sealed into the finish. Follow the directions on the can to avoid air bubbles in the finish. I found that a synthetic brush and a sponge tip applicator worked best. At one point I could not get rid of the bubbles, but soon realized that I wasn’t sanding well enough between each coat. Once I corrected that, I was able to get a smooth finish without the bubbles. Sanding between each coat is important.
So that’s it! I hope you like the finished product and that my experience might inspire you to face your own similar challenge. The gratification is inexplicable!
Ahhh, so happy! Life is good.
Now, for that dinner party!
Thanks for visiting.
The Finished Product!


Thanks so much for visiting!
Kim

This buffet looks perfect in that spot! And I love the painting above it. Beautiful and sentimental.
Thanks Babe! I’ glad you like it.
I love your blog Kim and the buffet is exquisite. I enjoyed hearing how much your learned through the research and application of every loving step to restore this treasure. You should be very proud indeed.
Also thank you for the reminder to enjoying the process as well as the end result.
The finished piece is so beautiful, but the message, I believe, is in the process. A life lesson; a vision of what one can become if we work to remove the protective coating we wear each day. The beauty lies beneath the outer layers.
I also love the painting above the buffet, and the milk glass vase reminds me of home and the pieces of milk glass my Mother loved.
By the way, I am Barbara, a friend of Nadine’s from Tennessee.
You are so right, Barbara. The process alone was my lesson. I too love the painting which belonged to my parents and I got the hobnail milk glass from a thrift store for $7. I just love it!. Thanks so much for writing!
Wow that is gorgeous! What a steal, for $40!
Thank you, Iheartvegetables! It certainly was! I look forward to more projects! Hopefully I’ll be as lucky! Thank you for visiting!
Love the blog Momma! You have inspired me to make a blog of my own. Can’t wait to see what comes next. Love you!
Thank you, Princess Peanut!
I love you! Always and forever!
It is gorgeous…. You did a wonderful job… I love your blog… What a perfect name for it also.. Bea
Thank you, Bea! I still have a logo to do. I was hoping to have a vivid brilliat red Cardinal landing and bringing a sprig to a nest. Would it be too presumptuous of me to ask you if you would paint or draw something for me? or maybe with a worm in her mouth. A happy worm that is:)
Thank you so much, Bea! I am still figuring this all out. It’s not as easy as I had hoped. I have a typo and it’s driving me crazy that I can’t seem to be able to edit it out! I still want to add a logo of a Cardinal landing on a nest with a sprig, or a happy worm is his mouth. Ya know anyone who could paint or draw that for me? 🙂
OMG that is the most beautiful piece.. you must do more and put them out for sale,,,,yes it is much work but you love doing stuff like this,,,,,,it really is Stunning love the color
Thank you Sister! It was gratifying
Yay, I like this new blog! Keep up the great work. 🙂